


Diamond Painting - Full Drill - Poppy Flower
Diamond Painting - Full Drill - Poppy Flower
Couldn't load pickup availability
Give the gift of relaxation with our 5D painting kit. Our pre-printed canvas looks similar to cross-stitching grids, so it's coded to make the process of placing the rhinestones a fun and relaxing experience.
We designed our painting by diamonds kit to come with everything you need to create new unique works of art.
- Form: Single
- Material: Resin
- Pasting Area: Full
- Diamond Shape: Square
- Set Type: no
- Frame: No
- Usage: Home decoration/Wall stickers/gift
- About Diamonds: 100% full Square & Round drill
- diamond type: 5D
- The Most Complete Gem Art Kit: We designed our kit of diamond painting beads to have everything you need to create your own unique beach rhinestone painting.
- Relax with This Zero-Mess Craft: Our adhesive jewel art diamond canvas is easy to follow, and the process is simple, so you can relax and create without any mess or clean-up.
- Comes with Extra Rhinestones and Full Set of Tools: You won't have to worry about losing or running out of rhinestone beads, because our kit comes with extra beads
- Created by Arteza Artists: Here at Arteza, we are passionate about creating products that inspire. For us, art is an expression of the human experience. That's why we work to make Our art supplies accessible to all people.
- We Care About Our Customers: We want to ensure you have a great experience with our products because we truly care about our customers. Our team strives to create products we can stand behind. If you have any issues with our products, please reach out and we'll make it right.
Package Content:
1 X Diamond Painting Canva (diamonds need to be pasted)
1 Set X Diamond Painting Tools (not including painting frame)
1 Set X Rhinestone Bag
Why Buy From Us?
Why Buy From Us?
✔ Free Shipping For Orders Over $120.
✔ WE OFFER 30-DAYS SATISFACTION GUARANTEE WITH MONEY BACK...pssst, we will fix problems no matter how long it's been.
✔ YOU CAN CONTACT OUR 24/7 CUSTOMER SUPPORT AT ANY TIME...we normally respond immediately.
✔ ULTRA HIGH QUALITY PRODUCTS!
How to diamond paint
How to diamond paint
- Choose Your Color – Pour the diamonds into the tray and shake lightly so they face up.
- Dip & Pick – Use the applicator pen with wax to pick up each sparkling diamond.
- Place on Canvas – Match the diamond to its symbol and press it onto the sticky canvas.
- Repeat & Enjoy – Continue the process, watching your artwork come to life one diamond at a time.
How to Paint by Numbers
How to Paint by Numbers
Step 1 : Open Your Kit
Unpack your kit and neatly set out the canvas, paints, and brushes in your space.
Step 2 : Relax and Paint
Match numbers with colors and start painting from the top corner down.
Step 3 : Ta-Da! You’re Done
Yay! Your masterpiece is complete — let it dry, frame it, and enjoy the view.
How to cross stitch on stamped canvas
How to cross stitch on stamped canvas
How to do Embroidery Cross Stitching – Practical tips for users to get started with Embroidery Cross Stitching
1) If you have never done cross-stitch in your life, you have come to the right place!
I had never embroidered before either! Cross-stitch embroidery is a good way to get into Art as a beginner. It is a creative hobby that anyone can start, there is clearly no age to start. There are younger and older people that do it (we have customers that are over 90 years old who do Cross-Stich or Diamond Painting on a daily basis).
The creative leisure activity is relaxing, it allows you to find inner peace while developing your creativity. If I have managed to do it, believe me, you will too!
The principles are as follows:
The principle of Cross-Stitch Embroidery is to completely cover the surface of a canvas, thus representing a motif, using threads of different colours with which you form crosses.
See? It’s not complicated!
2) Material provided:
In your cross stitch kit, you will find all the materials you need to complete your project!
a) An 11CT pre-printed Aïda canvas, which means that the fineness of the weave corresponds to 11 stitches for a length of one inch (=2.5cm).
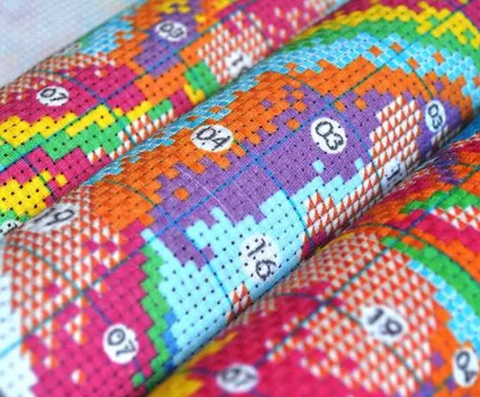
The pre-printed design on the fabric has all the symbols and instructions to guide you through your embroidery.
The good news is that the pre-printed colour design dissolves in water. After you have 100% finished embroidering your work, simply soak your canvas in warm water for a few hours and only your cross-stitches will remain visible on the canvas!
b) A coloured paper guide showing the same symbols and instructions as on the pre-printed canvas design.
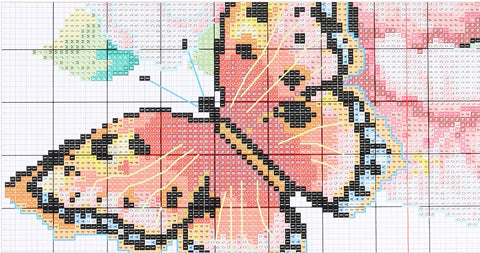
This guide therefore gives you access to all the symbols, colours, or thread numbers for each stitch on the canvas, and in a way that is sometimes more practical, manageable and independent than with a direct reading on the canvas.
c) A set of pre-sorted, pre-cut and numbered embroidery threads via a perforated backing card.
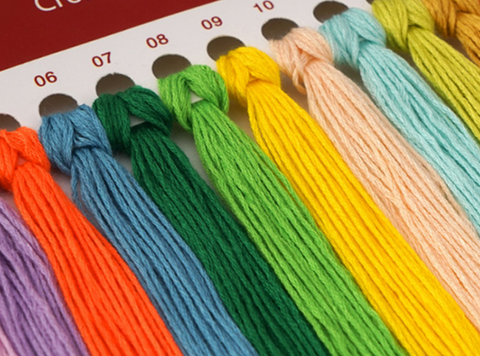
The number on each thread allows you to refer to the legend on the canvas or on the paper guide to find the correspondence between each symbol, number, and colour of embroidery thread.
d) A small accessory kit including embroidery needles, an embroidery thimble (although embroidery needles do not sting the fingers), and two types of threaders to thread your threads through the needle quickly and efficiently.
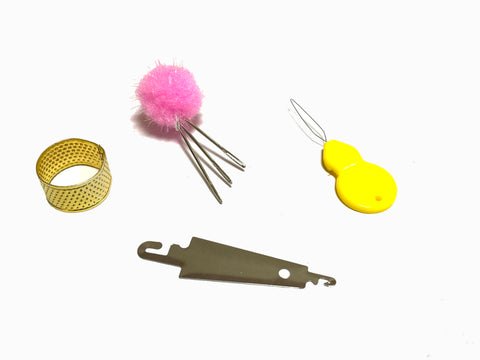
3) How to prepare yourself before starting your cross-stitch embroidery
Before you start threading your needles, or embroidering your first cross-stitches on your canvas, it is important to take the time to get your bearings between the symbols on the canvas or paper guide, the numbers on the thread card, and the actual threads to be threaded onto your needle.
This can also be a good opportunity, in addition to the marking, to decide on the first area on the canvas where you will start embroidering. We generally recommend starting with a relatively large area, with many stitches to get the hang of it!
Important reminder about symbols, legend and threads:
Sometimes the symbols shown on the fabric are of a colour that is relatively close to the colour of the real thread to be embroidered on that symbol. However, be careful, this is not always the case!
Here is an example of a SIMPLE case, but rare:
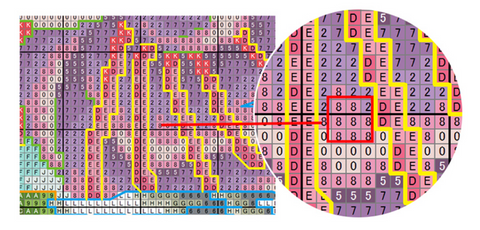
Your paper guide and your canvas show you a square, pink symbol with an 8 in it.
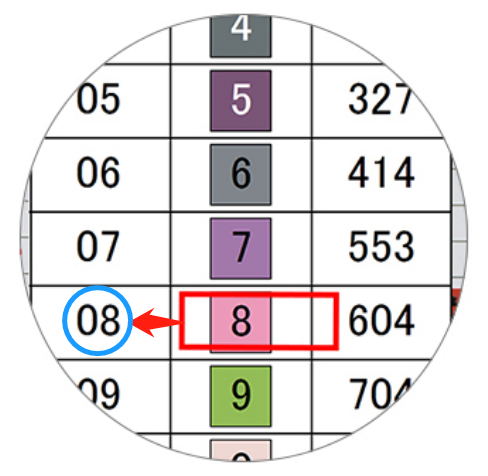
So you refer to the legend on the side of your canvas or paper guide, and you notice that the thread number to be selected, here in the left-hand column, circled in blue, is number 8. (You will note the similarity between the canvas symbol, which is a pink square with an 8 in it, and the embroidery thread number, which is also number 8.
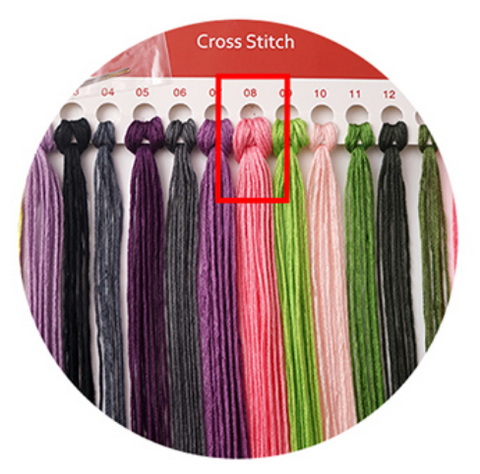
All that remains is to find thread number 8 on the perforated support card. And you will notice that thread 8 is pink, and corresponds in this "simple" case only, to the pink colour of the symbol indicated on the canvas as well as on the paper guide.
Warning:
In some cases, the colour or number of the symbol on your canvas or paper guide does not match the number or colour of the wire on the punch card.
In order to emphasise the contrasts and to allow a better visibility on the canvas, the "simple" case as described in the previous example may not always be feasible. (especially in the case of designs with colour gradations with several juxtaposed colours that are very similar to each other).
It is therefore very important to take your time and to make a thread and symbol mark before starting anything.
Here is a more complicated example, it is important to understand it well:
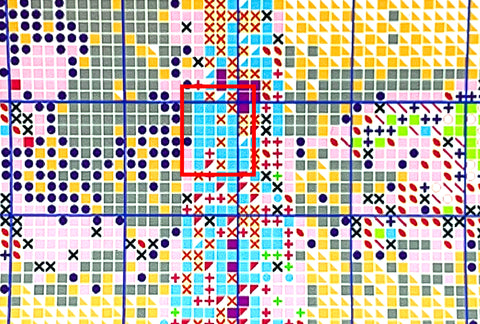
Your paper guide and your canvas show you a square, blue symbol with no numbers or shapes in this area.
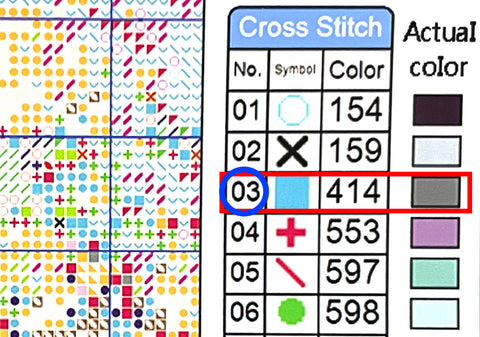
So you refer to the legend on the side of your canvas or paper guide, and you notice that the thread number to be selected, here in the left-hand column, circled in blue, is the number 3. (You will note this time that there is no similarity between the canvas symbol, which is a blue square without a number, and the thread number to be embroidered, which is a 3)
Furthermore, you have probably noticed that to the right of the symbol in the legend, another number is indicated. This reference, usually a 3 or 4 digit number, is a colour reference according to a DMC embroidery standard.
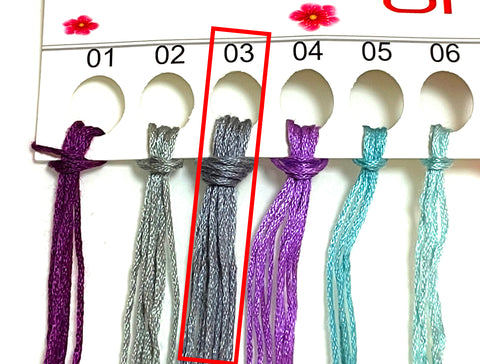
All that remains is to find wire number 3 on the supporting punch card. And you will notice that thread 3 is grey, and therefore does not correspond to the blue colour of the blue square symbol indicated on the canvas and on the paper guide.
We therefore insist on the importance of a good preparation and a good location of your legends, symbols, and threads, so that you do not embroider the wrong thread and only realise it several hours or days later, which would imply a lot of work to correct everything.
4) How to prepare your thread and needle
The first thing to know before threading your thread into a needle is that an embroidery thread is made up of 6 strands.
When making Figured'Art Cross Stitch embroidery kits with Aïda canvas in 11 CT, it is important to note that only 3 of the 6 strands are necessary.

Once you have separated your new 3-strand thread, you can thread it through your needle by hand or with the threader.
No matter which type of threader you prefer to use, the principle remains the same:


Important note: Once your thread has been threaded through the needle, it is not necessary to tie it to the needle. Just make sure you always have enough thread on both sides of the needle ring so that it doesn't slip off the needle when passing repeatedly through your fabric or through your straight stitches on the back of the fabric (when you want to stop a thread, see Chapter 9).
5) Understanding your first Cross Stitch
An Aïda canvas is composed of several small holes forming a grid. A Cross Stitch consists of connecting 4 holes together with a thread, making a cross shape "X".

Stitch from underneath the canvas at the bottom left of a square, then from above the canvas at the top right, making the first part of the cross (1 and 2).
The thread ends up on the bottom of the canvas, then you stitch from underneath the canvas on the bottom right and stitch over the canvas on the top left, which forms a cross.
6) Start your first thread well
When starting a colour, and therefore a new thread, it is important to attach the end of the thread to the back of the canvas to ensure the stability of all your thread and stitches in the area using that portion of thread.
As a rule, when you start with your first cross-stitch, make sure you do not pull your thread too far (or you will have to start again), and that you keep 2 or 3 cm on the back of your canvas.
This extra 2 or 3 cm can be blocked on the back of the fabric by your first line of cross stitch. Indeed, on the back of the canvas, your cross stitches should look like several lines of thread under which your excess portion can be stopped.

Using this technique, there is no need to tie the thread to the canvas, and this will keep the back of your canvas clean. If the 2 or 3 cm of thread is not completely blocked, you can always cut the excess.
Note: If you wish to start a thread in an area of your fabric that is next to an area that is already fully embroidered, you can also start your thread using the straight stitches in that area (located on the back of the fabric)
You can refer to 9) below to understand the details of this technique.
7) Link your cross-stitches well
When embroidering a series of cross-stitches of the same colour, there are generally two ways to go about it:
a) The first is to make a complete cross-stitch, one after the other.

In this example you can see that each cross stitch is complete (1-2-3-4), before continuing on to the next (again 1-2-3-4).
b) The second method is to first make all the diagonals in one direction on a whole row of cross stitches, and then come back to all your stitches by embroidering the second diagonal, in the other direction.

In this example you can see the order of all the first diagonals from left to right (1-2-3-4-5-6-7-8), then back from right to left on the second diagonal (9-10-11-12 etc...)
Note: When linking several cross-stitches, make sure you always pull your thread tight on each stitch as you pass in front of and behind the canvas. There should be no slack in your stitches.
8) Follow the order of your Cross-Stitches
In order to obtain an optimal result with your cross stitches, it is important to always stitch in the same direction.

In this example, the pink diagonal was made first between 1 and 2, then the second blue diagonal between 3 and 4.
For an optimal result, you should always have this diagonal on top.
This is nothing more or less than the same principle as the order of shoelaces in order to have a clean and orderly appearance.

9) How to stop your thread
Once you have completed all the cross-stitches in an area of your canvas with the same colour of thread, it is necessary to stop your thread.
To stop a thread, first make sure that the needle with the thread is on the back of the fabric, and then block the thread below the non-diagonal stitches on the back of the fabric (and therefore below the threads of your last line of cross-stitching done before you want to stop the thread). In general, a minimum of 3 and a maximum of 5 non-diagonal straight stitches are used to block a thread.

In this example, you can clearly see that the needle with the thread goes under 4 straight stitches on the back of the fabric.
After passing your thread through 3-5 straight stitches on the back of the fabric, you can cut off the excess and then start a new area with the same thread or a new area using a different colour of thread.
10) Isolated stitches? Stop or keep your thread?
Sometimes an area of stitches to be embroidered contains a number of stitches that are more or less distant from the main area.
In this case, a dilemma arises, should I stop my thread and start it again or can I "skip" several squares of the grid by the underside of the fabric?
We usually advise stopping your thread and restarting it at the isolated point(s) only if the distance exceeds 5 or 6 squares on the canvas grid, in order to keep the back of the canvas organised and also to avoid wasting too much thread.
Example with a yarn whose symbol on the canvas is an orange square:

In this example we can see that starting from the most important area on the left (framed in green) it is always possible to "jump" several squares of the grid via the back of the canvas, in order to directly reach isolated points (which are here less than 6 squares from the starting area).
Note: If the distance exceeds 5 or 6 squares on the grid, it is of course more time-consuming and tedious to stop your thread and then restart it elsewhere, but don't forget that without this, not only do you risk wasting a lot of thread, but the back of your canvas will be covered with lines of unstitched thread, connecting stitches over long distances, making your canvas very messy and increasingly difficult to work with.
11) Washing your canvas
Once the design has been fully embroidered, your cross-stitches fully completed and your threads fully stopped, it is necessary to soak your fabric in warm water (30°C maximum) for a few hours, rinse it and then leave it to dry at room temperature.
The pattern and the lines or legends pre-printed on your canvas are made from a special ink that can be dissolved in water.
Once this stage is complete, you will notice that only your cross-stitches will remain visible on your canvas, representing your work perfectly.
12) The final Touch: Ironing
Once your canvas has been soaked, rinsed and dried, you can gently iron the back of the canvas at a low temperature to seal and flatten your dots.
Discover our full collection of stamped cross stitch kits and get started today!


Description
Give the gift of relaxation with our 5D painting kit. Our pre-printed canvas looks similar to cross-stitching grids, so it's coded to make the process of placing the rhinestones a fun and relaxing experience.
We designed our painting by diamonds kit to come with everything you need to create new unique works of art.
- Form: Single
- Material: Resin
- Pasting Area: Full
- Diamond Shape: Square
- Set Type: no
- Frame: No
- Usage: Home decoration/Wall stickers/gift
- About Diamonds: 100% full Square & Round drill
- diamond type: 5D
- The Most Complete Gem Art Kit: We designed our kit of diamond painting beads to have everything you need to create your own unique beach rhinestone painting.
- Relax with This Zero-Mess Craft: Our adhesive jewel art diamond canvas is easy to follow, and the process is simple, so you can relax and create without any mess or clean-up.
- Comes with Extra Rhinestones and Full Set of Tools: You won't have to worry about losing or running out of rhinestone beads, because our kit comes with extra beads
- Created by Arteza Artists: Here at Arteza, we are passionate about creating products that inspire. For us, art is an expression of the human experience. That's why we work to make Our art supplies accessible to all people.
- We Care About Our Customers: We want to ensure you have a great experience with our products because we truly care about our customers. Our team strives to create products we can stand behind. If you have any issues with our products, please reach out and we'll make it right.
Package Content:
1 X Diamond Painting Canva (diamonds need to be pasted)
1 Set X Diamond Painting Tools (not including painting frame)
1 Set X Rhinestone Bag


New Arrivals
-
DIY 5D Diamond Painting - Full Round / Square - Sunflower Cow
Regular price From $14.99 USDRegular priceUnit price per -
Diamond Painting Crystal Rhinestone Flower Clock
Regular price $35.99 USDRegular priceUnit price per -
DIY Drawing Resin Crystal Rhinestone Diamond Painting Clock
Regular price $35.99 USDRegular priceUnit price per -
DIY Diamond Painting Decor Hanging Clock - Mandala (With Clock Function) D
Regular price $35.99 USDRegular priceUnit price per -
DIY Diamond Painting Decor Hanging Clock - Mandala (With Clock Function) C
Regular price $35.99 USDRegular priceUnit price per -
DIY Diamond Painting Decor Hanging Clock - Mandala (With Clock Function) B
Regular price $35.99 USDRegular priceUnit price per -
DIY Diamond Painting Decor Hanging Clock - Mandala (With Clock Function) A
Regular price $35.99 USDRegular priceUnit price per -
DIY Diamond Painting Decor Hanging Clock - Butterfly
Regular price $35.99 USDRegular priceUnit price per -
DIY Diamond Painting Decor Hanging Clock - Dragonfly
Regular price $35.99 USDRegular priceUnit price per -
DIY Diamond Painting Clock Acrylic Desk Ornament - Beer
Regular price $35.99 USDRegular priceUnit price per


-

NEW LEVEL OF QUALITY
Our products made from high-quality materials. All orders are subject to a quality check before being sent. Your painting won't disappoint you.
-

FREE & EXPRESS SHIPPING
We provide free delivery worldwide on orders over $120. We will process your order in 3 business days after you place it. After sending the order, real-time parcel status update information will be sent directly to your email address.
-

SUPPORT AT ALL TIMES
Our support works 7 days a week, even on weekends (8AM-23PM CET). If you are having any problems, just email us. Our support is sure to help you!
-

GUARANTEES & SAFETY
Your payment is protected by Paypal systems. If we can't fulfill or deliver your order, we'll give you 100% money-back.


